Theory and Practice of Creating Okular Digital Signatures in Ubuntu
Recently, I needed to sign and return some documents, but I realized that there was no simple documentation for how to use the new Okular digital signatures in Ubuntu. Digital signatures have long been available to those using Adobe Acrobat for PDFs, but the ability to sign PDFs using free and open-source software (FOSS) is recent. The Okular package in apt-get Ubuntu 22.04 LTS “Jammy Jellyfish” is the oldest release with the digital signatures enabled. I recently switched to this LTS release — I wait longer than most to switch since I prefer KDE, and new releases often have a “growing pains” period for the environment. When I finally tried to hack together a the Okular digital signatures in Ubuntu, once updated, I found the documentation wanting. New features like this often have sparse documentation until someone makes a post for the masses (like this one).
TL;DR skip to The Code section at the bottom.
A Brief History Lesson
Danger of Identifiers
In the dark ages, we were forced to insert and flatten images of signatures into PDFs using Xournal or GIMP. This was a dangerous hack, since images of signatures are sensitive information capable of identifying a user. I am guilty of this too. Signatures are not meant to be security feature for most cases. However, this sentiment by security professionals on “should” does not reflect reality. For example, every American is assigned a social security number which is only meant to identify the person for social welfare programs and NOT to be used as a general identifier.
But the reality is that lazy designers have begun to use these numbers as human identifiers. As the prominence of computers and automation have proceeded to envelope our lives, the attack surface has grown. Now an American’s social security number may be enough for identity thieves to fraudulently access lines of credit in the holder’s name. Similarly, users should avoid practices which expose human identifiers, such as unprotected signatures. Since applicants need only “sign on the dotted line” for many things, an identity thief with access to an unsecured signature .png can sign anything they choose.
FOSS Poppler
A proper digital signature reduces the attack surface somewhat. To my knowledge, only non-FOSS software like Adobe gave users the ability to digitally sign documents. The Adobe method is quite convenient. The user only needs to input their information into the GUI and a certificate is signed for the user by one of Adobe’s partners. But as good stewards of the net, we should do our best to avoid non-FOSS software. The FOSS back-end of most modern FOSS PDF tools, Poppler, has had this on their TODO list for at least 5 years (see original Bugzilla and current Gitlab), and the issue was closed only a year prior to this post. Okular was one of the first (if not the first) to officially support this new change when the programmer announced it in January.
The Challenge of Okular Digital Signatures in Ubuntu
According to the manual, the new capability requires user to generate certificates with Mozilla’s NSS tools. But currently the documentation is sparse. As of this writing, Stack Exchange barely has any useful information on the topic, mostly through this answer. Hacking my way through internet search results, I found a user named Rajeesh with an example of how to incorporate digital signatures into Okular using similar, but he relies on an Indian-based cert authority download that I don’t know enough about to trust blindly. Reminder: always know what the code does before copy-pasting from somebody on the internet. And that includes me!
If we hunt around Rajesh’s description for NSS, we can find some decent info on it from the Arch (btw) Wiki. Sadly, the Arch pacman package nss is not available in apt-get. If we apt search nss, we return too many packages to be useful. Instead, let’s focus on the command Arch recommends called certutil. Sure enough, an Ubuntu man page exists for certutil. The second line of that page tells us what provides certutil. Now we are in business!
RTFM and Pain
To my dismay, when I RTFM, I see a slew of security jargon. So, I started hacking my way through the examples on the man page, running into loads of issues since the jargon makes assumptions about the user’s knowledge level. Plus, this is an old program. The NSS back end is old enough to drink, smoke, and die for its country. I consider myself comfortable with the terminal, but this is odd. Some of the interactive loops are so poorly documented, you may encounter seemingly infinite loops without pre-existing knowledge of how they work. Yet this program will probably never change. NSS is a core part of security of the internet. Too many things use it now to change it for silly reasons like “user friendliness.”
Ubuntu as the Linux Gateway
Based on market share, Ubuntu is the most popular Linux distro, dropping to 32.4% as of the start of 2023. Ubuntu is often touted as the gateway to Linux distros. Experienced Linux users sometimes switch to other distros after learning on Ubuntu. Often these other distros meet some need that Ubuntu could not. In my opinion, distro-hopping is a luxury of the young and energetic. Some of us have real work to do, and we just want something FOSS to do it on. For me, I can usually get something to work well enough on my Kubuntu system. I spend more time doing productive work this way rather than chasing FOSS issues. Ironically, issues still come up, and here we are!
The Code
With that lengthy discussion out of the way, let’s look at the code to make this work… kinda. NOTE: I am not an expert in security. Never blindly trust code you see on the internet. Someone may come up with a better, more refined method. However, this seems to work. This has only been tested on Kubuntu 22.04.1 LTS x86_64.
First, we need to get the tools we need from apt.
sudo apt-get update
sudo apt-get install libnss3-tools
Check if you have the correct database already made. If you have Firefox, Thunderbird, or other NSS native application, you may already have this on your system. Check with:
if ls $HOME/.pki/nssdb/cert* 1> /dev/null 2>&1; then echo "db exists"; else echo "You need to install db"; fiIf you “You need to install db” in your terminal, do the following. Otherwise, skip this block.
mkdir $HOME/.pki/
mkdir $HOME/.pki/nssdb
certutil -N -d sql:$HOME/.pki/nssdb
This created the folders where the NSS database needs to be stored and initializes the SQL database at that path with the -N argument.
Now we get to the meat of the operation. We need to create a self-signed certificate with the appropriate trust information. We will then refer to this certificate later in Okular. Edit and use this one-liner with your information:
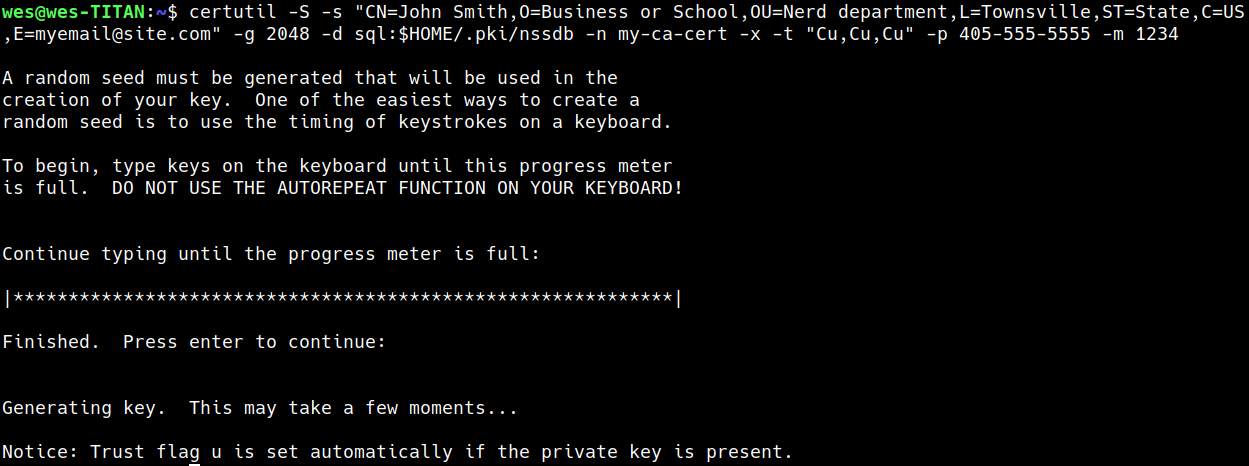
certutil -S -s "CN=John Smith,O=Business or School,OU=Nerd department,L=Townsville,ST=State,C=US,E=myemail@site.com" -g 2048 -d sql:$HOME/.pki/nssdb -n my-ca-cert -x -t "Cu,Cu,Cu" -p 405-555-5555 --email myemail@site.com -m 1234Let me break down what we just did in this step. We have told certutil to do the following:
-Stellscertutilyou want to create a brand new entry.-stellscertutilthe subject to use for this new entry. This subject line should match standard forms for a certificate signing authority (see here). Specifically, I have use the comma delimited fields:CN=John Smith– The “Common Name” of your certification entity. For a personal user, this should be your name.O=Business or School– The “Organization Name” that your CN belongs to. For official business you should use your business or university. For personal usage, try using “Personal” as your organization.OU=Nerd department– The “Organizational Unit” that your CN belongs to at your O. Again, for official business, you should use your official department like “IT dept” or “School of Meteorology”. For personal use, I omitted this.L=Townsville– Your “Location” is the town or city you want this to be registered in.ST=State– If appropriate, include your “State” or province here.C=US– Your “Country” should be the official two-letter country code. Check the list if you are unsure of yours.E=myemail@site.com– The email address you want associated with the cert.- DANGER – You may see other fields used in the subject line. This may cause
certutilto fail. For example, I usedEMAIL=myemail@site.comas was suggested by the wikipedia entry for subject line codes. However, this field is unexpected by NSS, and it will throw a fit if you try to include it. For more detail than you could possibly care about, see the exact specifications for the subject field.
-gtellscertutilwhat size to make the key in bits. You need to choose a multiple of 256 for this number. This argument uses 2048 as the default, so it is optional as written. However, I have included it in case you want to increase the size to something like 4096, which is becoming more standard. Beware that large key sizes may not be supported by all services, and it may induce downstream errors. Smaller key sizes down to 512 are possible, but that is usually a poor choice for a key.-dtellscertutilthe directory to use for certificate storage. Here, I have used the system default (which I created in the steps above) at$HOME/.pki/nssdb. Note that this code includes asql:prefix. This prefix is necessary on all modern systems as modern NSS stores keys in SQL databases rather than plaintext. You must declaresql:any time you call the database.-ntellscertutilthe arbitrary name that you would like to assign to this entry. It is useful to name the entry something meaningful, such asmy-ca-certin the example where we are creating a Certificate Authority certificate.-xtellscertutilthat you want to self-sign the certificate. This is very important, as someone must “sign” the certificate to vouch that you are truthful. Often, self-signed certificates are not acceptable as they are not verified by a trusted third-party. Companies exist which offer this as a service for a yearly fee (which I can’t afford). If you are doing something serious which requires trusted signatures on documents, you should consider investing in a trusted key signing. However, self-signing is “good enough” for most purposes of demonstrating that you read and agree to the document, which is what most users need for PDF digital signatures. Be aware, that the self-signed cert will be flagged when a user inspects the signature. For example, when viewing the signature in adobe. There will be a note that says something similar to Adobe cannot verify the legitimacy of the signature. For most things, no one cares. A signature is not a “secure” method of signing as discussed in the history section above. If you recipient cares, then you need to graduate beyond what this post can teach and get a third-party verification.-ttellscertutilwhat “trust” to assign to this certificate. This is a nuanced security issue that I, honestly, do not understand. I know that we want this to be treated as a trusted certificate authority (hence theCportion). I also know that I want this entry to be associated with a private RSA key (u). This is repeated three times. Once for SSL, email, and object signing. For PDFs, we only really care about object signatures. RTFM for more info on options.-ptellscertutilthe phone number of the signer. We want this to be associated with our real number for trust verification if necessary.- Finally, we assign a unique serial number to the certificate with
-m. The serial number is only unique in your system, so if you only have a few of these, just smash in a random integer.
We execute this command and are told to button mash for a few seconds to introduce entropy into the system. And voilà, the certificate is ready for use in Okular.
Other Useful certutil Commands
Here are a few things that you may find useful when working with certutil. Notably, this is how you check your work and fix mistakes.
- List all existing certs in your database:
certutil -d sql:$HOME/.pki/nssdb -L - Show a single cert in detail:
certutil -d sql:$HOME/.pki/nssdb -L -n my-ca-cert - Delete a specific cert from the database
certutil -D -d sql:$HOME/.pki/nssdb -n my-ca-cert
Enabling Okular Digital Signatures in Ubuntu
Now that our certificate is created, we are ready to tell Okular how to sign things. At this point, we mostly have to follow the instructions in Okular. For completeness, this is the method:
- Open Okular and click on the dropdown menu option “Settings” > “Configure Backends…”
- In the PDF tab, add your path to the NSS databases. It should look like
$HOME/.pki/nssdb. You will see your available certificates in the database. At some point during this step, you will be required to restart Okular.
- In Okular again, go to “Tools” > “Digitally Sign…”. You will be instructed to draw a rectangle for the signature region. If the rectangle you draw is too small, you may need to redraw it to be larger. Next, you will select the certificate you want to sign with from a drop-down menu on a popup box. You will be asked to save a new copy of the signed document. Here, I have drawn a rectangle to digitally sign a cookbook I wrote recently.
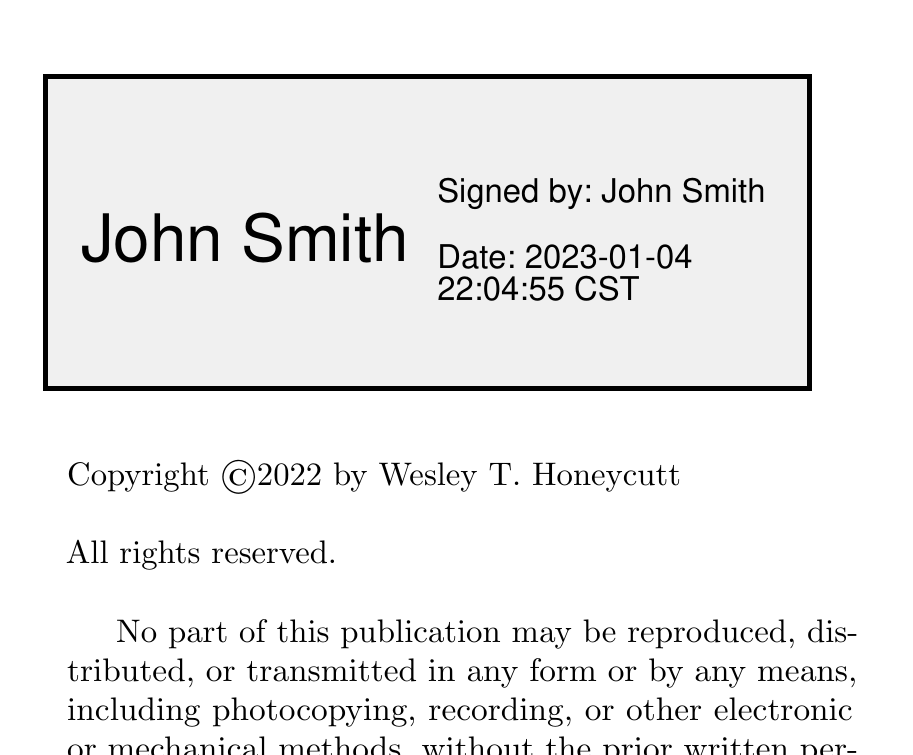
The signature block is an ugly gray rectangle. Hopefully there will be a way to make it pretty in the future, but this is what we have for now. If you poke around the “Signatures Panel”, you will see the date that this document was signed. Right clicking on the part that says “Rev. 1 signed by John Smith” or similar, you get more detailed information. You can read the information in the cert about who signed this.
Good luck!